-
1. Começando
- 1.1 Sobre Controle de Versão
- 1.2 Uma Breve História do Git
- 1.3 O Básico do Git
- 1.4 A Linha de Comando
- 1.5 Instalar o Git
- 1.6 Configuração Inicial do Git
- 1.7 Pedindo Ajuda
- 1.8 Resumo
-
2. Noções Básicas do Git
- 2.1 Obtendo um Repositório Git
- 2.2 Recording Changes to the Repository
- 2.3 Veja o Histórico de Confirmação
- 2.4 Desfazer Coisas
- 2.5 Working with Remotes
- 2.6 Tagging
- 2.7 Alias Git
- 2.8 Resumo
-
3. Ramificação do Git
- 3.1 Branches in a Nutshell
- 3.2 Basic Branching and Merging
- 3.3 Branch Management
- 3.4 Branching Workflows
- 3.5 Remote Branches
- 3.6 Rebasing
- 3.7 Resume
-
4. Git no Servidor
- 4.1 The Protocols
- 4.2 Getting Git on a Server
- 4.3 Generating Your SSH Public Key
- 4.4 Setting Up the Server
- 4.5 Git Daemon
- 4.6 Smart HTTP
- 4.7 GitWeb
- 4.8 GitLab
- 4.9 Opções Hospedadas de Terceiros
- 4.10 Resumo
-
5. Git Distribuído
- 5.1 Distributed Workflows
- 5.2 Contributing to a Project
- 5.3 Maintaining a Project
- 5.4 Resumo
-
6. GitHub
-
7. Ferramentas do Git
- 7.1 Revision Selection
- 7.2 Interactive Staging
- 7.3 Stashing and Cleaning
- 7.4 Signing Your Work
- 7.5 Searching
- 7.6 Rewriting History
- 7.7 Reset Demystified
- 7.8 Advanced Merging
- 7.9 Rerere
- 7.10 Debugging with Git
- 7.11 Submodules
- 7.12 Bundling
- 7.13 Replace
- 7.14 Credential Storage
- 7.15 Resumo
-
8. Personalizar o Git
- 8.1 Git Configuration
- 8.2 Git Attributes
- 8.3 Git Hooks
- 8.4 An Example Git-Enforced Policy
- 8.5 Resumo
-
9. O Git e Outros Sistemas
- 9.1 O Git como Cliente
- 9.2 Migrar para o Git
- 9.3 Resumo
-
10. Internos do Git
- 10.1 Plumbing and Porcelain
- 10.2 Git Objects
- 10.3 Git References
- 10.4 Packfiles
- 10.5 The Refspec
- 10.6 Transfer Protocols
- 10.7 Maintenance and Data Recovery
- 10.8 Environment Variables
- 10.9 Resumo
-
A1. Appendix A: Git em Outros Ambientes
- A1.1 Graphical Interfaces
- A1.2 Git no Visual Studio
- A1.3 Git no Eclipse
- A1.4 Git in Bash
- A1.5 Git no Zsh
- A1.6 Git no Powershell
- A1.7 Resumo
-
A2. Appendix B: Incorporar o Git nos teus Aplicativos
- A2.1 Linha de comando Git
- A2.2 Libgit2
- A2.3 JGit
-
A3. Appendix C: Git Commands
- A3.1 Setup and Config
- A3.2 Getting and Creating Projects
- A3.3 Basic Snapshotting
- A3.4 Branching and Merging
- A3.5 Sharing and Updating Projects
- A3.6 Inspection and Comparison
- A3.7 Debugging
- A3.8 Patching
- A3.9 Email
- A3.10 External Systems
- A3.11 Administration
- A3.12 Plumbing Commands
5.2 Git Distribuído - Contributing to a Project
Contributing to a Project
The main difficulty with describing how to contribute to a project are the numerous variations on how to do that. Because Git is very flexible, people can and do work together in many ways, and it’s problematic to describe how you should contribute — every project is a bit different. Some of the variables involved are active contributor count, chosen workflow, your commit access, and possibly the external contribution method.
The first variable is active contributor count — how many users are actively contributing code to this project, and how often? In many instances, you’ll have two or three developers with a few commits a day, or possibly less for somewhat dormant projects. For larger companies or projects, the number of developers could be in the thousands, with hundreds or thousands of commits coming in each day. This is important because with more and more developers, you run into more issues with making sure your code applies cleanly or can be easily merged. Changes you submit may be rendered obsolete or severely broken by work that is merged in while you were working or while your changes were waiting to be approved or applied. How can you keep your code consistently up to date and your commits valid?
The next variable is the workflow in use for the project. Is it centralized, with each developer having equal write access to the main codeline? Does the project have a maintainer or integration manager who checks all the patches? Are all the patches peer-reviewed and approved? Are you involved in that process? Is a lieutenant system in place, and do you have to submit your work to them first?
The next variable is your commit access. The workflow required in order to contribute to a project is much different if you have write access to the project than if you don’t. If you don’t have write access, how does the project prefer to accept contributed work? Does it even have a policy? How much work are you contributing at a time? How often do you contribute?
All these questions can affect how you contribute effectively to a project and what workflows are preferred or available to you. We’ll cover aspects of each of these in a series of use cases, moving from simple to more complex; you should be able to construct the specific workflows you need in practice from these examples.
Commit Guidelines
Before we start looking at the specific use cases, here’s a quick note about commit messages.
Having a good guideline for creating commits and sticking to it makes working with Git and collaborating with others a lot easier.
The Git project provides a document that lays out a number of good tips for creating commits from which to submit patches — you can read it in the Git source code in the Documentation/SubmittingPatches file.
First, your submissions should not contain any whitespace errors.
Git provides an easy way to check for this — before you commit, run git diff --check, which identifies possible whitespace errors and lists them for you.
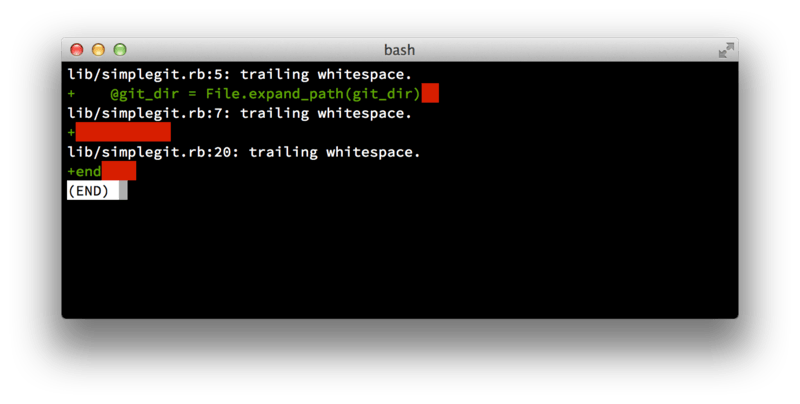
git diff --check.If you run that command before committing, you can tell if you’re about to commit whitespace issues that may annoy other developers.
Next, try to make each commit a logically separate changeset.
If you can, try to make your changes digestible — don’t code for a whole weekend on five different issues and then submit them all as one massive commit on Monday.
Even if you don’t commit during the weekend, use the staging area on Monday to split your work into at least one commit per issue, with a useful message per commit.
If some of the changes modify the same file, try to use git add --patch to partially stage files (covered in detail in Interactive Staging).
The project snapshot at the tip of the branch is identical whether you do one commit or five, as long as all the changes are added at some point, so try to make things easier on your fellow developers when they have to review your changes.
This approach also makes it easier to pull out or revert one of the changesets if you need to later. Rewriting History describes a number of useful Git tricks for rewriting history and interactively staging files — use these tools to help craft a clean and understandable history before sending the work to someone else.
The last thing to keep in mind is the commit message. Getting in the habit of creating quality commit messages makes using and collaborating with Git a lot easier. As a general rule, your messages should start with a single line that’s no more than about 50 characters and that describes the changeset concisely, followed by a blank line, followed by a more detailed explanation. The Git project requires that the more detailed explanation include your motivation for the change and contrast its implementation with previous behavior — this is a good guideline to follow. It’s also a good idea to use the imperative present tense in these messages. In other words, use commands. Instead of “I added tests for” or “Adding tests for,” use “Add tests for.” Here is a template originally written by Tim Pope:
Short (50 chars or less) summary of changes

More detailed explanatory text, if necessary.  Wrap it to
about 72 characters or so.  In some contexts, the first
line is treated as the subject of an email and the rest of
the text as the body.  The blank line separating the
summary from the body is critical (unless you omit the body
entirely); tools like rebase can get confused if you run
the two together.

Further paragraphs come after blank lines.

  - Bullet points are okay, too

  - Typically a hyphen or asterisk is used for the bullet,
    preceded by a single space, with blank lines in
    between, but conventions vary here
If all your commit messages follow this model, things will be much easier for you and the developers with whom you collaborate.
The Git project has well-formatted commit messages — try running git log --no-merges there to see what a nicely-formatted project-commit history looks like.
|
Note
|
Do as we say, not as we do.
For the sake of brevity, many of the examples in this book don’t have nicely-formatted commit messages like this; instead, we simply use the In short, do as we say, not as we do. |
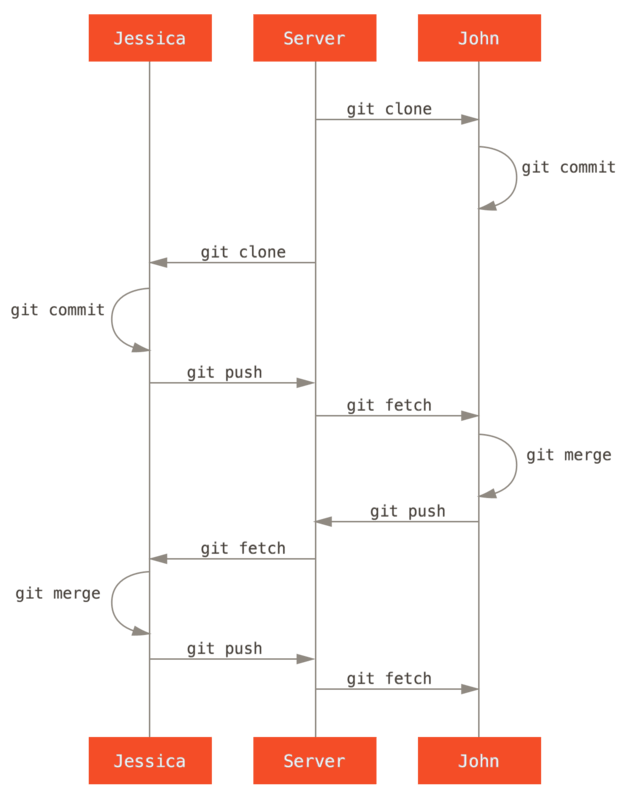
Private Small Team
The simplest setup you’re likely to encounter is a private project with one or two other developers. “Private,” in this context, means closed-source — not accessible to the outside world. You and the other developers all have push access to the repository.
In this environment, you can follow a workflow similar to what you might do when using Subversion or another centralized system.
You still get the advantages of things like offline committing and vastly simpler branching and merging, but the workflow can be very similar; the main difference is that merges happen client-side rather than on the server at commit time.
Let’s see what it might look like when two developers start to work together with a shared repository.
The first developer, John, clones the repository, makes a change, and commits locally.
(The protocol messages have been replaced with ... in these examples to shorten them somewhat.)
# John's Machine
$ git clone john@githost:simplegit.git
Cloning into 'simplegit'...
...
$ cd simplegit/
$ vim lib/simplegit.rb
$ git commit -am 'remove invalid default value'
[master 738ee87] remove invalid default value
 1 files changed, 1 insertions(+), 1 deletions(-)
The second developer, Jessica, does the same thing — clones the repository and commits a change:
# Jessica's Machine
$ git clone jessica@githost:simplegit.git
Cloning into 'simplegit'...
...
$ cd simplegit/
$ vim TODO
$ git commit -am 'add reset task'
[master fbff5bc] add reset task
 1 files changed, 1 insertions(+), 0 deletions(-)
Now, Jessica pushes her work to the server, which works just fine:
# Jessica's Machine
$ git push origin master
...
To jessica@githost:simplegit.git
   1edee6b..fbff5bc  master -> master
The last line of the output above shows a useful return message from the push operation.
The basic format is <oldref>..<newref> fromref -> toref, where oldref means the old reference, newref means the new reference, fromref is the name of the local reference being pushed, and toref is the name of the remote reference being updated.
You’ll see similar output like this below in the discussions, so having a basic idea of the meaning will help in understanding the various states of the repositories.
More details are available in the documentation for git-push.
Continuing with this example, shortly afterwards, John makes some changes, commits them to his local repository, and tries to push them to the same server:
# John's Machine
$ git push origin master
To john@githost:simplegit.git
 ! [rejected]        master -> master (non-fast forward)
error: failed to push some refs to 'john@githost:simplegit.git'
In this case, John’s push fails because of Jessica’s earlier push of her changes. This is especially important to understand if you’re used to Subversion, because you’ll notice that the two developers didn’t edit the same file. Although Subversion automatically does such a merge on the server if different files are edited, with Git, you must first merge the commits locally. In other words, John must first fetch Jessica’s upstream changes and merge them into his local repository before he will be allowed to push.
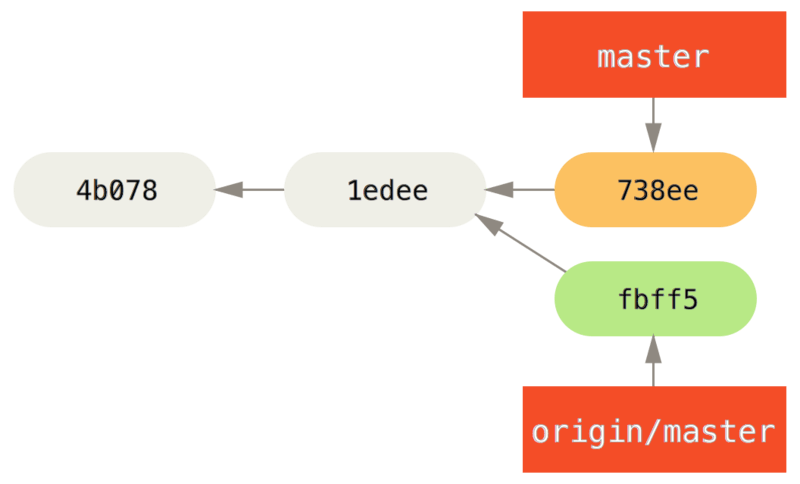
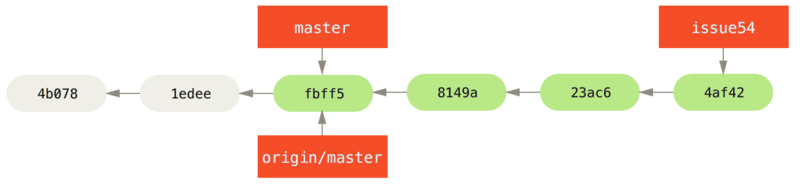
As a first step, John fetches Jessica’s work (this only fetches Jessica’s upstream work, it does not yet merge it into John’s work):
$ git fetch origin
...
From john@githost:simplegit
 + 049d078...fbff5bc master     -> origin/master
At this point, John’s local repository looks something like this:
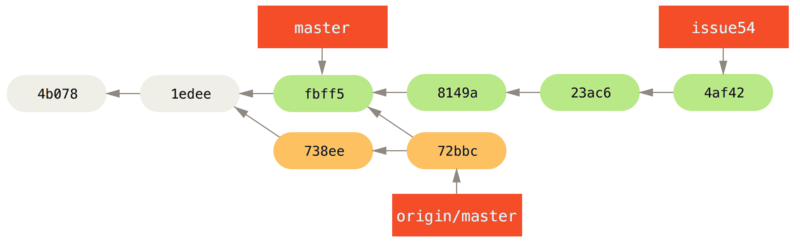
Now John can merge Jessica’s work that he fetched into his own local work:
$ git merge origin/master
Merge made by the 'recursive' strategy.
 TODO |    1 +
 1 files changed, 1 insertions(+), 0 deletions(-)
As long as that local merge goes smoothly, John’s updated history will now look like this:
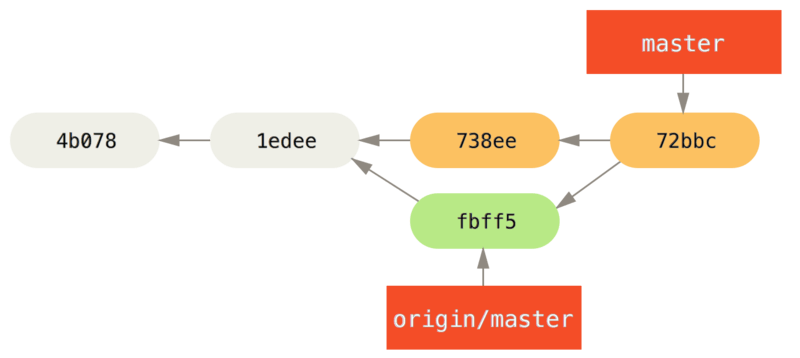
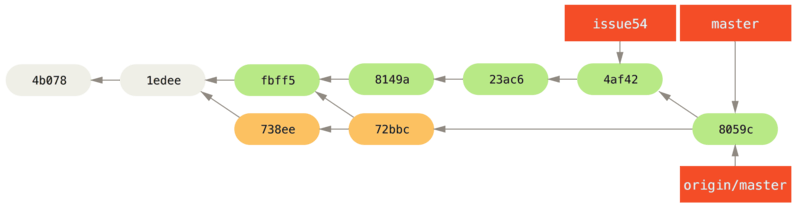
origin/master.At this point, John might want to test this new code to make sure none of Jessica’s work affects any of his and, as long as everything seems fine, he can finally push the new merged work up to the server:
$ git push origin master
...
To john@githost:simplegit.git
   fbff5bc..72bbc59  master -> master
In the end, John’s commit history will look like this:
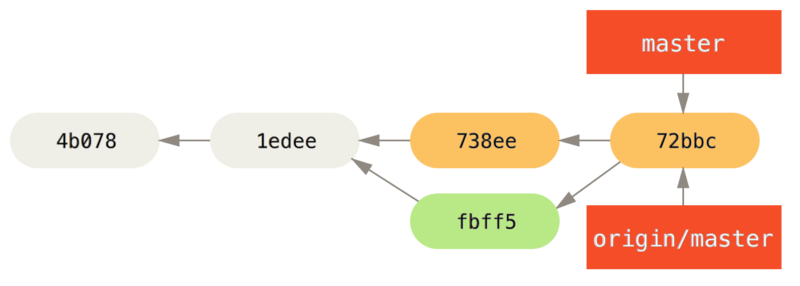
origin server.In the meantime, Jessica has created a new topic branch called issue54, and made three commits to that branch.
She hasn’t fetched John’s changes yet, so her commit history looks like this:
Suddenly, Jessica learns that John has pushed some new work to the server and she wants to take a look at it, so she can fetch all new content from the server that she does not yet have with:
# Jessica's Machine
$ git fetch origin
...
From jessica@githost:simplegit
   fbff5bc..72bbc59  master     -> origin/master
That pulls down the work John has pushed up in the meantime. Jessica’s history now looks like this:
Jessica thinks her topic branch is ready, but she wants to know what part of John’s fetched work she has to merge into her work so that she can push.
She runs git log to find out:
$ git log --no-merges issue54..origin/master
commit 738ee872852dfaa9d6634e0dea7a324040193016
Author: John Smith <jsmith@example.com>
Date:   Fri May 29 16:01:27 2009 -0700

   remove invalid default value
The issue54..origin/master syntax is a log filter that asks Git to display only those commits that are on the latter branch (in this case origin/master) that are not on the first branch (in this case issue54).
We’ll go over this syntax in detail in Commit Ranges.
From the above output, we can see that there is a single commit that John has made that Jessica has not merged into her local work.
If she merges origin/master, that is the single commit that will modify her local work.
Now, Jessica can merge her topic work into her master branch, merge John’s work (origin/master) into her master branch, and then push back to the server again.
First (having committed all of the work on her issue54 topic branch), Jessica switches back to her master branch in preparation for integrating all this work:
$ git checkout master
Switched to branch 'master'
Your branch is behind 'origin/master' by 2 commits, and can be fast-forwarded.
Jessica can merge either origin/master or issue54 first — they’re both upstream, so the order doesn’t matter.
The end snapshot should be identical no matter which order she chooses; only the history will be different.
She chooses to merge the issue54 branch first:
$ git merge issue54
Updating fbff5bc..4af4298
Fast forward
 README           |    1 +
 lib/simplegit.rb |    6 +++++-
 2 files changed, 6 insertions(+), 1 deletions(-)
No problems occur; as you can see it was a simple fast-forward merge.
Jessica now completes the local merging process by merging John’s earlier fetched work that is sitting in the origin/master branch:
$ git merge origin/master
Auto-merging lib/simplegit.rb
Merge made by the 'recursive' strategy.
 lib/simplegit.rb |    2 +-
 1 files changed, 1 insertions(+), 1 deletions(-)
Everything merges cleanly, and Jessica’s history now looks like this:

Now origin/master is reachable from Jessica’s master branch, so she should be able to successfully push (assuming John hasn’t pushed even more changes in the meantime):
$ git push origin master
...
To jessica@githost:simplegit.git
   72bbc59..8059c15  master -> master
Each developer has committed a few times and merged each other’s work successfully.
That is one of the simplest workflows.
You work for a while (generally in a topic branch), and merge that work into your master branch when it’s ready to be integrated.
When you want to share that work, you fetch and merge your master from origin/master if it has changed, and finally push to the master branch on the server.
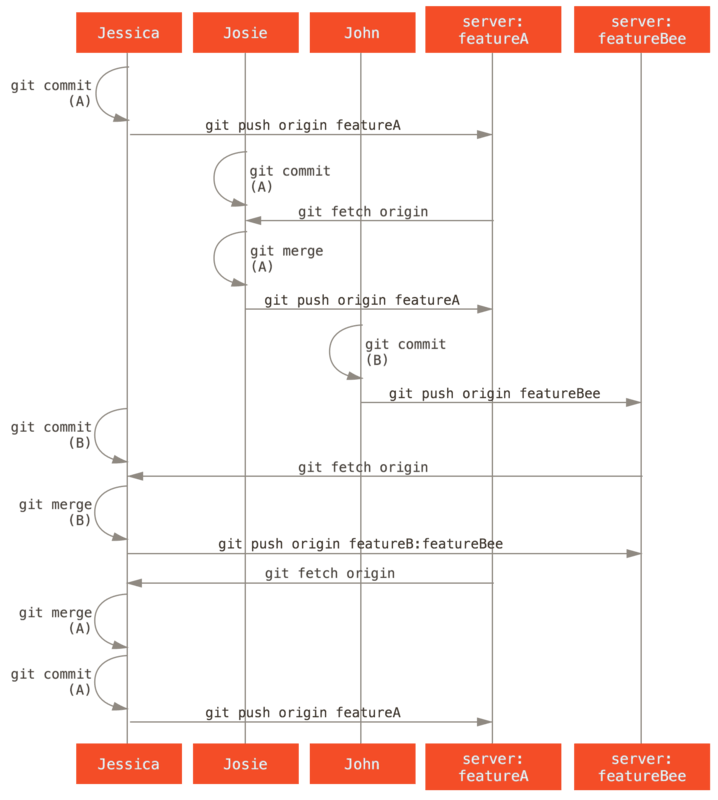
The general sequence is something like this:
Private Managed Team
In this next scenario, you’ll look at contributor roles in a larger private group. You’ll learn how to work in an environment where small groups collaborate on features, after which those team-based contributions are integrated by another party.
Let’s say that John and Jessica are working together on one feature (call this “featureA”), while Jessica and a third developer, Josie, are working on a second (say, “featureB”).
In this case, the company is using a type of integration-manager workflow where the work of the individual groups is integrated only by certain engineers, and the master branch of the main repo can be updated only by those engineers.
In this scenario, all work is done in team-based branches and pulled together by the integrators later.
Let’s follow Jessica’s workflow as she works on her two features, collaborating in parallel with two different developers in this environment.
Assuming she already has her repository cloned, she decides to work on featureA first.
She creates a new branch for the feature and does some work on it there:
# Jessica's Machine
$ git checkout -b featureA
Switched to a new branch 'featureA'
$ vim lib/simplegit.rb
$ git commit -am 'add limit to log function'
[featureA 3300904] add limit to log function
 1 files changed, 1 insertions(+), 1 deletions(-)
At this point, she needs to share her work with John, so she pushes her featureA branch commits up to the server.
Jessica doesn’t have push access to the master branch — only the integrators do — so she has to push to another branch in order to collaborate with John:
$ git push -u origin featureA
...
To jessica@githost:simplegit.git
 * [new branch]      featureA -> featureA
Jessica emails John to tell him that she’s pushed some work into a branch named featureA and he can look at it now.
While she waits for feedback from John, Jessica decides to start working on featureB with Josie.
To begin, she starts a new feature branch, basing it off the server’s master branch:
# Jessica's Machine
$ git fetch origin
$ git checkout -b featureB origin/master
Switched to a new branch 'featureB'
Now, Jessica makes a couple of commits on the featureB branch:
$ vim lib/simplegit.rb
$ git commit -am 'made the ls-tree function recursive'
[featureB e5b0fdc] made the ls-tree function recursive
 1 files changed, 1 insertions(+), 1 deletions(-)
$ vim lib/simplegit.rb
$ git commit -am 'add ls-files'
[featureB 8512791] add ls-files
 1 files changed, 5 insertions(+), 0 deletions(-)
Jessica’s repository now looks like this:

She’s ready to push her work, but gets an email from Josie that a branch with some initial “featureB” work on it was already pushed to the server as the featureBee branch.
Jessica needs to merge those changes with her own before she can push her work to the server.
Jessica first fetches Josie’s changes with git fetch:
$ git fetch origin
...
From jessica@githost:simplegit
 * [new branch]      featureBee -> origin/featureBee
Assuming Jessica is still on her checked-out featureB branch, she can now merge Josie’s work into that branch with git merge:
$ git merge origin/featureBee
Auto-merging lib/simplegit.rb
Merge made by the 'recursive' strategy.
 lib/simplegit.rb |    4 ++++
 1 files changed, 4 insertions(+), 0 deletions(-)
At this point, Jessica wants to push all of this merged “featureB” work back to the server, but she doesn’t want to simply push her own featureB branch.
Rather, since Josie has already started an upstream featureBee branch, Jessica wants to push to that branch, which she does with:
$ git push -u origin featureB:featureBee
...
To jessica@githost:simplegit.git
   fba9af8..cd685d1  featureB -> featureBee
This is called a refspec.
See The Refspec for a more detailed discussion of Git refspecs and different things you can do with them.
Also notice the -u flag; this is short for --set-upstream, which configures the branches for easier pushing and pulling later.
Suddenly, Jessica gets email from John, who tells her he’s pushed some changes to the featureA branch on which they are collaborating, and he asks Jessica to take a look at them.
Again, Jessica runs a simple git fetch to fetch all new content from the server, including (of course) John’s latest work:
$ git fetch origin
...
From jessica@githost:simplegit
   3300904..aad881d  featureA   -> origin/featureA
Jessica can display the log of John’s new work by comparing the content of the newly-fetched featureA branch with her local copy of the same branch:
$ git log featureA..origin/featureA
commit aad881d154acdaeb2b6b18ea0e827ed8a6d671e6
Author: John Smith <jsmith@example.com>
Date:   Fri May 29 19:57:33 2009 -0700

    changed log output to 30 from 25
If Jessica likes what she sees, she can merge John’s new work into her local featureA branch with:
$ git checkout featureA
Switched to branch 'featureA'
$ git merge origin/featureA
Updating 3300904..aad881d
Fast forward
 lib/simplegit.rb |   10 +++++++++-
1 files changed, 9 insertions(+), 1 deletions(-)
Finally, Jessica might want to make a couple minor changes to all that merged content, so she is free to make those changes, commit them to her local featureA branch, and push the end result back to the server.
$ git commit -am 'small tweak'
[featureA 774b3ed] small tweak
 1 files changed, 1 insertions(+), 1 deletions(-)
$ git push
...
To jessica@githost:simplegit.git
   3300904..774b3ed  featureA -> featureA
Jessica’s commit history now looks something like this:
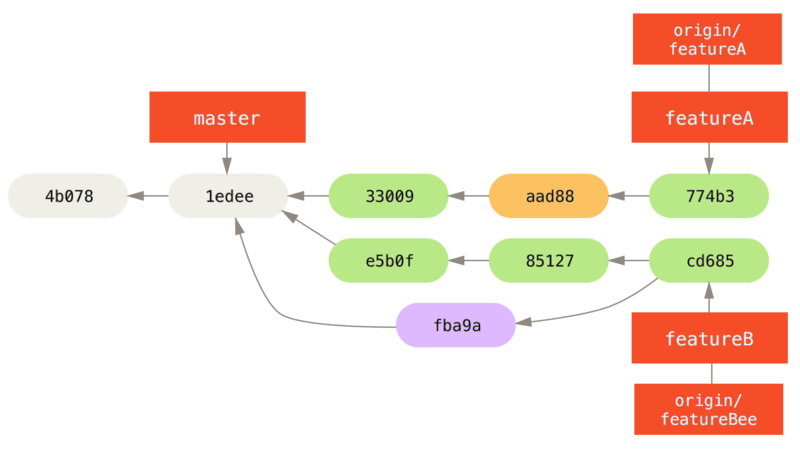
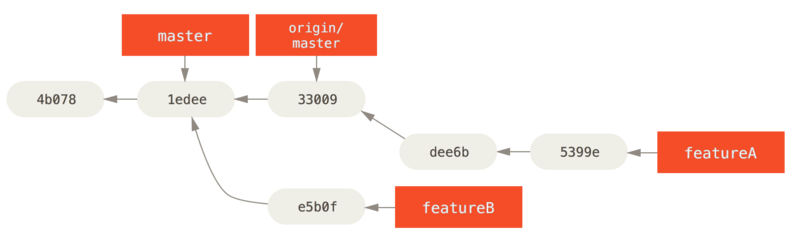
At some point, Jessica, Josie, and John inform the integrators that the featureA and featureBee branches on the server are ready for integration into the mainline.
After the integrators merge these branches into the mainline, a fetch will bring down the new merge commit, making the history look like this:
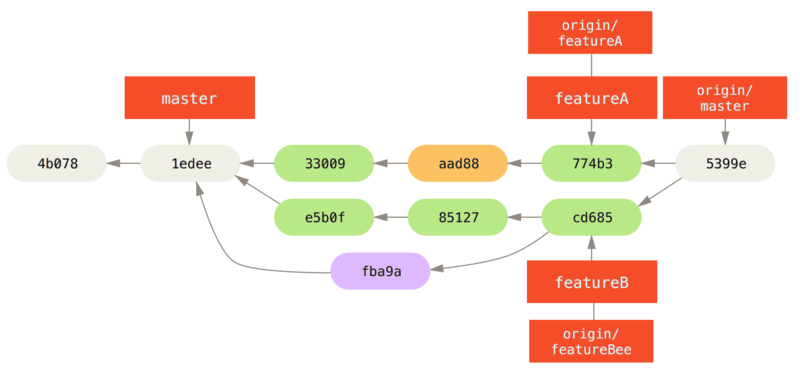
Many groups switch to Git because of this ability to have multiple teams working in parallel, merging the different lines of work late in the process. The ability of smaller subgroups of a team to collaborate via remote branches without necessarily having to involve or impede the entire team is a huge benefit of Git. The sequence for the workflow you saw here is something like this:
Forked Public Project
Contributing to public projects is a bit different. Because you don’t have the permissions to directly update branches on the project, you have to get the work to the maintainers some other way. This first example describes contributing via forking on Git hosts that support easy forking. Many hosting sites support this (including GitHub, BitBucket, repo.or.cz, and others), and many project maintainers expect this style of contribution. The next section deals with projects that prefer to accept contributed patches via email.
First, you’ll probably want to clone the main repository, create a topic branch for the patch or patch series you’re planning to contribute, and do your work there. The sequence looks basically like this:
$ git clone <url>
$ cd project
$ git checkout -b featureA
  ... work ...
$ git commit
  ... work ...
$ git commit|
Note
|
You may want to use |
When your branch work is finished and you’re ready to contribute it back to the maintainers, go to the original project page and click the “Fork” button, creating your own writable fork of the project.
You then need to add this repository URL as a new remote of your local repository; in this example, let’s call it myfork:
$ git remote add myfork <url>You then need to push your new work to this repository.
It’s easiest to push the topic branch you’re working on to your forked repository, rather than merging that work into your master branch and pushing that.
The reason is that if your work isn’t accepted or is cherry-picked, you don’t have to rewind your master branch (the Git cherry-pick operation is covered in more detail in Rebasing and Cherry-Picking Workflows).
If the maintainers merge, rebase, or cherry-pick your work, you’ll eventually get it back via pulling from their repository anyhow.
In any event, you can push your work with:
$ git push -u myfork featureA
Once your work has been pushed to your fork of the repository, you need to notify the maintainers of the original project that you have work you’d like them to merge.
This is often called a pull request, and you typically generate such a request either via the website — GitHub has its own “Pull Request” mechanism that we’ll go over in GitHub — or you can run the git request-pull command and email the subsequent output to the project maintainer manually.
The git request-pull command takes the base branch into which you want your topic branch pulled and the Git repository URL you want them to pull from, and produces a summary of all the changes you’re asking to be pulled.
For instance, if Jessica wants to send John a pull request, and she’s done two commits on the topic branch she just pushed, she can run this:
$ git request-pull origin/master myfork
The following changes since commit 1edee6b1d61823a2de3b09c160d7080b8d1b3a40:
  John Smith (1):
        added a new function

are available in the git repository at:

  git://githost/simplegit.git featureA

Jessica Smith (2):
      add limit to log function
      change log output to 30 from 25

 lib/simplegit.rb |   10 +++++++++-
 1 files changed, 9 insertions(+), 1 deletions(-)
This output can be sent to the maintainer — it tells them where the work was branched from, summarizes the commits, and identifies from where the new work is to be pulled.
On a project for which you’re not the maintainer, it’s generally easier to have a branch like master always track origin/master and to do your work in topic branches that you can easily discard if they’re rejected.
Having work themes isolated into topic branches also makes it easier for you to rebase your work if the tip of the main repository has moved in the meantime and your commits no longer apply cleanly.
For example, if you want to submit a second topic of work to the project, don’t continue working on the topic branch you just pushed up — start over from the main repository’s master branch:
$ git checkout -b featureB origin/master
  ... work ...
$ git commit
$ git push myfork featureB
$ git request-pull origin/master myfork
  ... email generated request pull to maintainer ...
$ git fetch origin
Now, each of your topics is contained within a silo — similar to a patch queue — that you can rewrite, rebase, and modify without the topics interfering or interdepending on each other, like so:
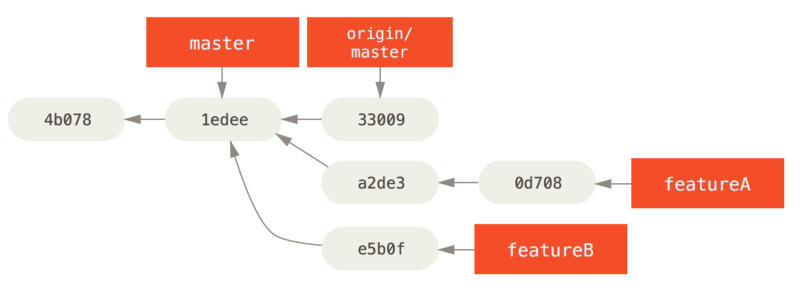
featureB work.Let’s say the project maintainer has pulled in a bunch of other patches and tried your first branch, but it no longer cleanly merges.
In this case, you can try to rebase that branch on top of origin/master, resolve the conflicts for the maintainer, and then resubmit your changes:
$ git checkout featureA
$ git rebase origin/master
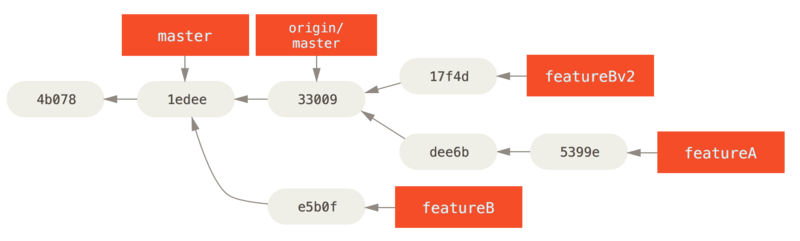
$ git push -f myfork featureAThis rewrites your history to now look like Commit history after featureA work..
featureA work.Because you rebased the branch, you have to specify the -f to your push command in order to be able to replace the featureA branch on the server with a commit that isn’t a descendant of it.
An alternative would be to push this new work to a different branch on the server (perhaps called featureAv2).
Let’s look at one more possible scenario: the maintainer has looked at work in your second branch and likes the concept but would like you to change an implementation detail.
You’ll also take this opportunity to move the work to be based off the project’s current master branch.
You start a new branch based off the current origin/master branch, squash the featureB changes there, resolve any conflicts, make the implementation change, and then push that as a new branch:
$ git checkout -b featureBv2 origin/master
$ git merge --squash featureB
  ... change implementation ...
$ git commit
$ git push myfork featureBv2
The --squash option takes all the work on the merged branch and squashes it into one changeset producing the repository state as if a real merge happened, without actually making a merge commit.
This means your future commit will have one parent only and allows you to introduce all the changes from another branch and then make more changes before recording the new commit.
Also the --no-commit option can be useful to delay the merge commit in case of the default merge process.
At this point, you can notify the maintainer that you’ve made the requested changes, and that they can find those changes in your featureBv2 branch.
featureBv2 work.Public Project over Email
Many projects have established procedures for accepting patches — you’ll need to check the specific rules for each project, because they will differ. Since there are several older, larger projects which accept patches via a developer mailing list, we’ll go over an example of that now.
The workflow is similar to the previous use case — you create topic branches for each patch series you work on. The difference is how you submit them to the project. Instead of forking the project and pushing to your own writable version, you generate email versions of each commit series and email them to the developer mailing list:
$ git checkout -b topicA
  ... work ...
$ git commit
  ... work ...
$ git commit
Now you have two commits that you want to send to the mailing list.
You use git format-patch to generate the mbox-formatted files that you can email to the list — it turns each commit into an email message with the first line of the commit message as the subject and the rest of the message plus the patch that the commit introduces as the body.
The nice thing about this is that applying a patch from an email generated with format-patch preserves all the commit information properly.
$ git format-patch -M origin/master
0001-add-limit-to-log-function.patch
0002-changed-log-output-to-30-from-25.patch
The format-patch command prints out the names of the patch files it creates.
The -M switch tells Git to look for renames.
The files end up looking like this:
$ cat 0001-add-limit-to-log-function.patch
From 330090432754092d704da8e76ca5c05c198e71a8 Mon Sep 17 00:00:00 2001
From: Jessica Smith <jessica@example.com>
Date: Sun, 6 Apr 2008 10:17:23 -0700
Subject: [PATCH 1/2] add limit to log function

Limit log functionality to the first 20

---
 lib/simplegit.rb |    2 +-
 1 files changed, 1 insertions(+), 1 deletions(-)

diff --git a/lib/simplegit.rb b/lib/simplegit.rb
index 76f47bc..f9815f1 100644
--- a/lib/simplegit.rb
+++ b/lib/simplegit.rb
@@ -14,7 +14,7 @@ class SimpleGit
   end

   def log(treeish = 'master')
-    command("git log #{treeish}")
+    command("git log -n 20 #{treeish}")
   end

   def ls_tree(treeish = 'master')
--
2.1.0
You can also edit these patch files to add more information for the email list that you don’t want to show up in the commit message.
If you add text between the --- line and the beginning of the patch (the diff --git line), the developers can read it, but that content is ignored by the patching process.
To email this to a mailing list, you can either paste the file into your email program or send it via a command-line program.
Pasting the text often causes formatting issues, especially with “smarter” clients that don’t preserve newlines and other whitespace appropriately.
Luckily, Git provides a tool to help you send properly formatted patches via IMAP, which may be easier for you.
We’ll demonstrate how to send a patch via Gmail, which happens to be the email agent we know best; you can read detailed instructions for a number of mail programs at the end of the aforementioned Documentation/SubmittingPatches file in the Git source code.
First, you need to set up the imap section in your ~/.gitconfig file.
You can set each value separately with a series of git config commands, or you can add them manually, but in the end your config file should look something like this:
[imap]
  folder = "[Gmail]/Drafts"
  host = imaps://imap.gmail.com
  user = user@gmail.com
  pass = YX]8g76G_2^sFbd
  port = 993
  sslverify = false
If your IMAP server doesn’t use SSL, the last two lines probably aren’t necessary, and the host value will be imap:// instead of imaps://.
When that is set up, you can use git imap-send to place the patch series in the Drafts folder of the specified IMAP server:
$ cat *.patch |git imap-send
Resolving imap.gmail.com... ok
Connecting to [74.125.142.109]:993... ok
Logging in...
sending 2 messages
100% (2/2) done
At this point, you should be able to go to your Drafts folder, change the To field to the mailing list you’re sending the patch to, possibly CC the maintainer or person responsible for that section, and send it off.
You can also send the patches through an SMTP server.
As before, you can set each value separately with a series of git config commands, or you can add them manually in the sendemail section in your ~/.gitconfig file:
[sendemail]
  smtpencryption = tls
  smtpserver = smtp.gmail.com
  smtpuser = user@gmail.com
  smtpserverport = 587
After this is done, you can use git send-email to send your patches:
$ git send-email *.patch
0001-added-limit-to-log-function.patch
0002-changed-log-output-to-30-from-25.patch
Who should the emails appear to be from? [Jessica Smith <jessica@example.com>]
Emails will be sent from: Jessica Smith <jessica@example.com>
Who should the emails be sent to? jessica@example.com
Message-ID to be used as In-Reply-To for the first email? y
Then, Git spits out a bunch of log information looking something like this for each patch you’re sending:
(mbox) Adding cc: Jessica Smith <jessica@example.com> from
  \line 'From: Jessica Smith <jessica@example.com>'
OK. Log says:
Sendmail: /usr/sbin/sendmail -i jessica@example.com
From: Jessica Smith <jessica@example.com>
To: jessica@example.com
Subject: [PATCH 1/2] added limit to log function
Date: Sat, 30 May 2009 13:29:15 -0700
Message-Id: <1243715356-61726-1-git-send-email-jessica@example.com>
X-Mailer: git-send-email 1.6.2.rc1.20.g8c5b.dirty
In-Reply-To: <y>
References: <y>

Result: OK
Summary
This section has covered a number of common workflows for dealing with several very different types of Git projects you’re likely to encounter, and introduced a couple of new tools to help you manage this process. Next, you’ll see how to work the other side of the coin: maintaining a Git project. You’ll learn how to be a benevolent dictator or integration manager.